One day my friend Mary
sent me a Wilbur for my daughter. I have to confess I was surprised that my then
2nd grader was very interested in using Wilbur too.
Wilbur
is a fun and unique learning tool made from an old bleach bottle. If you
haven't seen him - check him out!
Now I had a Wilbur and needed to generate ideas for how to use him. Coming up
with ideas for toddlers and preschoolers was easy. Other GamesForLearning list
members were also sharing great ideas. This left me with one question:
What do I do for my older child?
The first thing we did was use Wilbur as a fun drill for geography.
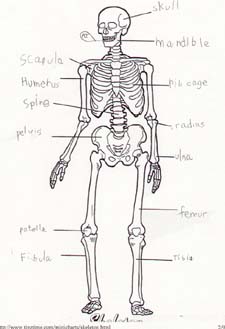
The second was to use Wilbur to learn the names of certain bones. I recently
came across the skeleton you see above and decided to share this idea with you.
The first thing I did was to find a picture of a skeleton. We used this
one. You'll want to print two of the skeletons. The next thing is to spend
some time with your child going over the names of the bones you want to learn.
Work with your child to label the skeleton.
Once your child has been introduced to the material and labeled the skeleton
it's your turn to do a bit of work. Grab a stack of index cards that will fit
nicely into your Wilbur. I use the smallest bleach bottles because getting the
index cards for a larger Wilbur can be a challenge.
Label the second skeleton sheet with NUMBERS ONLY. You might make the patella
number 1 and the skull number 2. OR you can simply start at the top and label,
working your way down. This sheet that you have created is what your child will
drill from.
Now you have to label the index cards in a way that will match the numbered
skeleton. Here's a hint - when I make Wilbur cards I ALWAYS drill the info from
both angles. One of my skeleton cards looks like this:
Scapula
3
On the BACK of that same card will be this:
3
Scapula
Remember that your child can only see what is written along the top of the card.
Before you create your whole deck do a test card and actually put it in the
Wilbur and look inside to be sure your child can see all the needed info
clearly.
You've done the prep and are ready to go. To play/drill you need to put a stack
of cards in Wilbur. Give your child the numbered skeleton. They will see a clue
along the top of the first card. If they see the word SKULL they have to look on
the sheet and find the number pointing to the skull. THEN they look inside
Wilbur to see if they are right. This immediate feedback will help to cement
ONLY correct information.
If the top of the card shows a number the child must find the number on the
skeleton and identify the name of the bone.
It really is THAT simple, and tons of fun, to set up a good self-checking drill
for your child. This can free you up to take a shower, cook or work with another
child.
When we used this we checked out tons of books from the library. We also watched
the Magic School Bus and listened to Them Not so Dry Bones on our School
House Rock video. We also drew life size pictures of the kids and filled in
various bones and organs.
I'm sure your kids will come to love Wilbur. If you're eager to make them one
but have no bleach bottles in the house consider using the 1 gallon Heinz
Vinegar bottles.